Import PSD
Spine can import the content of an Adobe Photoshop PSD file saved from Adobe Photoshop or any other graphics software capable of writing a PSD file. The layers in the PSD file are imported as attachments within a new or existing Spine project. Additionally, it is possible to automate the creation of skins, placeholders, slots, and more by annotating your layer names.
Import PSD provides similar functionality to our PhotoshopToSpine script, except it is much faster and doesn't require purchasing Adobe Photoshop.
Below is a non-exhaustive list of software that generate PSD files:
- Affinity
- Clip Studio Paint
- GIMP
- Krita
- Paint Tool SAI
- Photopea
- Procreate
Usage
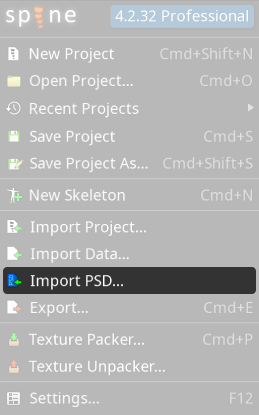
To open the PSD import dialog, choose Import PSD from the main menu.
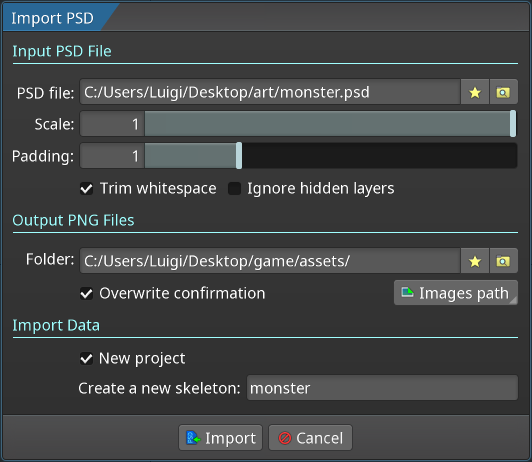
The Import PSD dialog has three sections: Input PSD File, Output PNG File, and Import Data.
Import PSD File
Choose the PSD file path and set options for the import process. The available options are:
PSD File: The path to the PSD file you want to import.Scale: Scales the layers before writing the image files. This is often used when the PSD is high resolution and you want to use more reasonably sized images in Spine.Padding: The number of transparent pixels to add around each image. This can avoid aliasing artifacts for opaque pixels along the image border.Trim whitespace: When checked, whitespace around the edges of each layer is removed. When unchecked, all images are the size of the PSD canvas.Ignore hidden layers: Hidden groups and layers are not output.
Output PNG Files
Choose the output folder where the images extracted from the PSD file will be saved. The available options are:
Folder: The folder where the extracted images will be saved.Overwrite confirmation: When checked, a confirmation dialog is shown if saving the images would result in overwriting existing files.Images path: The select box allows you to choose:- A skeleton in the current project. The path is set to the selected skeleton's image folder.
PSD Path: The path is set to the folder that contains the PSD file +/images.
Be careful when overwriting images. Once an image file is overwritten, it cannot be recovered.
Import Data
This section works the same as the Import Data dialog. Please refer to that documentation to understand its behavior.
PSD Setup
The group and layer names in the PSD are used to control how Spine outputs the image files.
Origin
The position of guides in the PSD determine the 0,0 origin in Spine. The first horizontal guide determines the y, while the first vertical guide determines the x. In the absence of horizontal and/or vertical guides, half of the width and half of the height will be used. Subsequent guides after the first for each axis are ignored by Spine, so they can be used without affecting the import process. You can also control the origin by using the [origin] tag on a layer, as explained in the section below.
The origin in the editor can end up at the edge of a pixel or in the center of a pixel, depending on the guide position (which can be placed between pixels) or, if there are no guides, on the canvas width/height (odd sizes result in the editor origin at the center of a pixel). It is recommended to place the origin at the edge of a pixel to avoid blurry filtering artifacts.
Tags
Using tags in group or layer names tells Spine how to process those items. Tags are surrounded by square brackets, for example [tag:value]. The tag is mandatory, while the :value depends on the tag and may be mandatory or optional. If the :value is omitted, the name of the layer or group will be used as the value. Tags can be inserted at any point in the layer name, for example: head [slot] or [slot] head. Some tags can only be used on layers, others only on groups, but most can be used on both.
Group and layer tags
[bone]or[bone:name]Layers, slots, and other bones are placed under a new bone. The new bone is created at the center of the first visible layer. Groups with the bone tag can be nested. Bone positions aren't updated if the bone exists.[slot]or[slot:name]Layers are placed in a slot.[skin]or[skin:name]Layers are placed in skin placeholders. Images of a layer with the skin tag are placed in a subfolder on disk with the name of the skin.[scale:number]Layers are scaled. Their attachments are scaled inversely so that they appear the same size in Spine.[rotate:degrees]Layers are rotated. Their attachments are rotated inversely so that they appear the same in Spine. This is useful to rotate images for better atlas packing.[pad:number]Padding ofnumberis added to the layer or the children of the group. Useful to add different padding from what is set through thePaddingoption.[folder]or[folder:name]Layers are placed in a subfolder on disk. Groups with the folder tag can be nested.[overlay]The layer is used as if it was a clipping mask for all underlying layers.[trim]or[trim:true]or[trim:ws]or[trim:false]or[trim:canvas]or[trim:mask]If the value is:- Not set,
true, orws: Forces the layer to have whitespace removed. falseorcanvas: Forces the layer to have the canvas size.mask: Forces the layer to be trimmed based on the size of the layer mask. This allows control over the size of an image even when using theTrim whitespaceoption. A layer mask can be useful when a mesh needs empty space around the edges to insert vertices in Spine. If no layer mask applies, the tag is ignored.
- Not set,
[ignore]The layer, groups, and child groups will be ignored.[!bones]Prevents the effect of the[bones]tag on this layer or group.[!slots]Prevents the effect of the[slots]tag on this layer or group.[!name]Prevents the effect of the[name:pattern]tag on this layer or group.[!path]Prevents the effect of the[path:pattern]tag on this layer or group.[!bone]Prevents the effect of the[bone:pattern]tag on this layer or group.[!slot]Prevents the effect of the[slot:pattern]tag on this layer or group.
Layer tags
These tags can only be applied to layers or groups having the [merge] tag.
[mesh]or[mesh:name]The layer is a mesh or, whennameis specified, a linked mesh. Thenameis matched against existing mesh attachment names by comparing/-separated segments from right to left. The most specific match is used. For example,[mesh:head]matches a mesh namedhead, and[mesh:front/head]disambiguates when multiple meshes end withhead. When[mesh:name]is used, the linked mesh uses the size of the source mesh.[path:name]Specifies the name of the image file on disk for the layer, for when it needs to be different from the attachment name.[origin]The center of the layer is used to determine the Spine editor origin. An image for the layer is not output.
Group tags
These tags can only be applied to a group.
[merge]Layers in this group will be merged into a single layer, resulting in a single image being output.[bones]Adds a[bone]tag to all immediate children.[slots]Adds a[slot]tag to all immediate children.
A pattern is a string that contains an asterisk (*). The pattern is used for all child layers, with the asterisk being replaced by a name or value in the child layer. For example: [name:prefix*suffix]
These tags have different behavior when the value is a pattern:
[name:pattern]Adds a prefix or suffix to the layer names in the group. The name conversion happens before the other pattern tags described below are applied.[path:pattern]Adds a prefix or suffix to the layer paths in the group. The layer path pattern is applied even if the layer has no[path]tag.[bone:pattern]Adds a prefix or suffix to the layer bones in the group.[slot:pattern]Adds a prefix or suffix to the layer slots in the group.
Attachment properties
The layer order, tag values, and layer names determine how Spine creates slots, attachments, placeholders, skins, and image paths. When the PSD file contains many groups and layers and many tags are used, it is helpful to understand how Spine interprets them to achieve the desired result.
The layer hierarchy is obtained by traversing from the outermost ancestor group to the layer itself. If a layer or group contains both the [skin] tag and the [folder] tag, precedence will be given to the [skin] tag.
Spine assigns the following properties to the layer in this way:
-
Slot: The value of the closest[slot]tag up the hierarchy, if present. Otherwise, it is the name of the layer. Use/in the slot name to create slot folders. -
Skin: Values of the[skin]tags from the hierarchy are selected. The closest[skin]tag up the hierarchy determines the name of the skin, and the remaining[skin]tags determine the folders where the skin image will be output. -
Placeholder: Values of the[folder]tags from the group hierarchy + the layer name. -
Attachment: Values of the[folder]and[skin]elements from the group hierarchy + the layer name. -
Attachment image path: Values of the[folder]tags from the group hierarchy + the layer name. If the layer has a[path]tag, it is used instead of the layer name.
Slashes
Starting a layer name or slot, skin, folder, or path tag value with / prevents the value from being influenced by parent groups. For example, [path:/name] will not use [folder] tags from parent groups.
If the slash is instead inside the name or tag value, it denotes subfolders. For example, [path:subfolder/name] causes the image to be output in a subfolder at subfolder/name.png.
Blending Modes
Spine recognizes a few Photoshop blending modes on groups or layers, causing the slot in Spine to have the appropriate blending mode.
Normalcorresponds to theNormalblending mode in Spine.Multiplycorresponds to theMultiplyblending mode in Spine.Screencorresponds to theScreenblending mode in Spine.Linear Dodgecorresponds to theAdditiveblending mode in Spine.
Draw order
When importing a PSD file, Spine will try to make the draw order reflect the layer order in the PSD. However, in some cases that is not possible. For example:
A [slot:slot-folder-1/A]B [slot:slot-folder-2/B]C [slot:slot-folder-1/C]
slot-folder-1 cannot be both before and after the slot-folder-2. In this case, the folder position is determined by the last slot found in the folder.
Limitations
Spine can only import pixel data for each layer. PSD features that are rendered by Photoshop rather than being stored as pixel data in the PSD file include:
- Layer styles
- Gradient layer masks
- Adjustment and fill layers (when not saved as pixel data)
- Percentage fill of a layer
If these features are used, a workaround is required for Import PSD to obtain pixel data:
- Convert the unsupported layers into smart objects. Photoshop will then save pixel data of the resulting layer in the PSD file.
- Use the PhotoshopToSpine script or other scripts available in the spine-script repository.
- Create a Spine-compatible PSD using the SpineCompatiblePsd script.